Sunset over the Columbia River Gorge at Viento State Park, Oregon
Jim Lundgren Photography
Thursday, June 30, 2011
Wednesday, June 29, 2011
Lessons in Photography - Exposure 101: Controls
Of all the questions that beginning photographers seem to ask most often, the majority of them seem to involve exposure. Why is my photo so dark? Why is my photo so light? I don't understand what all these numbers mean. Photography is the art of exposing light onto film... I mean digital sensor (sigh). If you don't understand exposure, you don't understand photography. It is as simple as that. Yes, you may get some good or even great images but it is akin to guessing at the horse track and coming home a winner. It may happen for a while, but when that perfect light is shining on that perfect mountain peak on the third day of your perfect backpacking trip, you probably prefer to not leave your results up to chance. So grab a cup of coffee, clear you brain, and try to get a handle on the basics of exposure. It is easier than you may think.
Exposing an image is similar to filling a glass of water at a faucet. You can turn the faucet on very slowly and dribble the water in for a long time, or you can open the faucet wide for a very short time and fill the glass quickly. The goal is simply to fill the glass full with the correct amount of water.The lens acts in a similar manner. You simply want to expose the sensor to the correct amount of light. There are three basic controls on every camera to accomplish this task.
 Aperture: The aperture is the size of the opening of the shutter. They are those funny numbers on the barrel of the lens (4, 5.6, 8, 11, 16, 22). You might see them referred to with a f/ in front of them like f/8 or f/16. Modern digital cameras may only have the aperture on the LCD display screen. Counterintuitively, the numbers are inverses. The smaller the number, the larger the opening and the larger the number, the smaller the opening. The aperture acts like the faucet on the sink. Small openings (f/22, f/16) are similar to dribbling the water into the glass. Large openings (f4, f5.6) act like turning the faucet on full force. To fully fill the glass, you need to leave the faucet on for a certain length of time which brings us to...
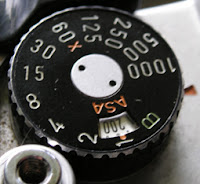 Shutter Speed: The shutter speed is usually found on a control dial on old film cameras and on the display screen for nearly all digital cameras. The numbers may be as short as 1/5000 of a second (it may be displayed as 5000) to as long as several seconds or even minutes (usually referred to as 2 sec, 2", 2 min, or 2' on the LCD screen). The shutter speed is analogous to how long you leave the faucet open. If you open the faucet just a crack then you need to leave it open for a long time to fill the glass. If you crank that sucker wide open, then it takes a very short time to fill the glass. On a camera lens, the shutter speed is simply the time the aperture is open and letting light stream through to strike the sensor.
ASA or ISO (same thing): OK, this is where the water glass analogy breaks down. The ASA is simply the sensitivity of the sensor to the light falling on it. Lower numbers (ASA 100, ASA 200) are less sensitive to light and require longer shutter speeds or larger aperture openings. Higher numbers (ASA 1000, HI) can use faster shutter speeds and smaller apertures.
As you might guess, there are trade-offs and advantages to all of these controls and we will talk about those in the next lesson. While you are waiting with anxious anticipation, try fiddling with your camera. Set the camera on automatic mode and change the aperture. Watch how the camera adjusts the shutter speed to compensate for your changing the size of the opening. Next, set the camera controls to manual and pick an aperture and shutter speed (if it is sunny, try starting at 1/125 of a second at f/8 at 100 ASA). After checking the exposure in the LCD screen, try adjusting the shutter speed while leaving the aperture alone. You should start to see a change in exposure. Have fun and I will see you for the next lesson.
Exposing an image is similar to filling a glass of water at a faucet. You can turn the faucet on very slowly and dribble the water in for a long time, or you can open the faucet wide for a very short time and fill the glass quickly. The goal is simply to fill the glass full with the correct amount of water.The lens acts in a similar manner. You simply want to expose the sensor to the correct amount of light. There are three basic controls on every camera to accomplish this task.
 Aperture: The aperture is the size of the opening of the shutter. They are those funny numbers on the barrel of the lens (4, 5.6, 8, 11, 16, 22). You might see them referred to with a f/ in front of them like f/8 or f/16. Modern digital cameras may only have the aperture on the LCD display screen. Counterintuitively, the numbers are inverses. The smaller the number, the larger the opening and the larger the number, the smaller the opening. The aperture acts like the faucet on the sink. Small openings (f/22, f/16) are similar to dribbling the water into the glass. Large openings (f4, f5.6) act like turning the faucet on full force. To fully fill the glass, you need to leave the faucet on for a certain length of time which brings us to...
 Shutter Speed: The shutter speed is usually found on a control dial on old film cameras and on the display screen for nearly all digital cameras. The numbers may be as short as 1/5000 of a second (it may be displayed as 5000) to as long as several seconds or even minutes (usually referred to as 2 sec, 2", 2 min, or 2' on the LCD screen). The shutter speed is analogous to how long you leave the faucet open. If you open the faucet just a crack then you need to leave it open for a long time to fill the glass. If you crank that sucker wide open, then it takes a very short time to fill the glass. On a camera lens, the shutter speed is simply the time the aperture is open and letting light stream through to strike the sensor.
ASA or ISO (same thing): OK, this is where the water glass analogy breaks down. The ASA is simply the sensitivity of the sensor to the light falling on it. Lower numbers (ASA 100, ASA 200) are less sensitive to light and require longer shutter speeds or larger aperture openings. Higher numbers (ASA 1000, HI) can use faster shutter speeds and smaller apertures.
As you might guess, there are trade-offs and advantages to all of these controls and we will talk about those in the next lesson. While you are waiting with anxious anticipation, try fiddling with your camera. Set the camera on automatic mode and change the aperture. Watch how the camera adjusts the shutter speed to compensate for your changing the size of the opening. Next, set the camera controls to manual and pick an aperture and shutter speed (if it is sunny, try starting at 1/125 of a second at f/8 at 100 ASA). After checking the exposure in the LCD screen, try adjusting the shutter speed while leaving the aperture alone. You should start to see a change in exposure. Have fun and I will see you for the next lesson.
Sunday, June 26, 2011
Story Behind The Image-Half Dome At Sunset
The young boy sat next to his father at the Glacier Point Overlook. He looked bored and obviously didn't want to be there as his father set up his tripod and camera. The boy shuffled and complained, whined and sulked, while the minutes ticked by and the sun slowly sank down to the horizon. I walked past the pair and headed further away from the viewpoint to escape the crush of photographers and visitors waiting for the evening show.
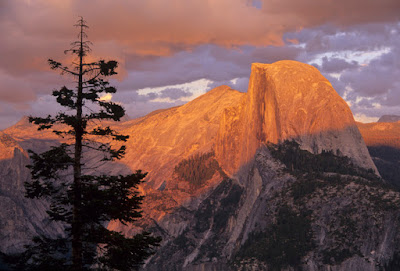 It was going to be great light that evening. I could feel it inside of me. I can never explain how I know. Intuition, that crazy combination of experience and luck, has lead to some of my best images in the past and I hoped it would prove true that evening. The cracks is the clouds allowed colored rays to shoot across the sky and illuminate the mountain tops. The next five minutes gave me some of the best sunset light the Sierra Nevada could provide. The rocks glowed with gold, then yellow, then orange, and finally red. The show ended with the highest and furthest peaks bathed in a surreal purplish haze of alpenglow.
The entire experience lasted about twenty minutes and I shot over 12 rolls of film during that time. I had never before, nor since, changed rolls so quickly, barely taking the time to stuff the film back into the canisters. After it was over, I slowly made my way back to my truck and passed the man and the young boy again. This time the man was trying to get the child to move and the boy was planted firmly on a rock, not wanting to budge an inch. He turned to his father and pleaded, "just one more minute Dad. I want to see if the mountains will change color again." The father sat down next to the boy and they stared out into the darkening sky. I thought to myself as I opened the door to my truck, "I couldn't have said it better myself."
Friday, June 24, 2011
Wednesday, June 22, 2011
5 Tips For Better Nature Photography
Did you ever go on a walk with the camera and not shoot a single frame? Did you ever come upon a great scene and not come home with an image that lives up to the memory? Are you just plain bored with photography? Here are five easy and simple ideas to fix your photographic dilemma.
Look Down: In our quest to find the next great vista, many times photographers forget to look down at the ground in front of them. At your feet is an endless supply of graphic designs waiting to be recorded on film. Pine cones nestling on a bed of needles, a tiny wildflower swimming in a sea of grass, or layers of rock sweeping across a desert are just a few of the millions of possibilities. If you don't live anywhere near a wilderness, or you are just plain bored with your surroundings, or you are stuck watching the kids in the backyard, looking down is a sure-fire remedy to get out of a rut and start creating images.
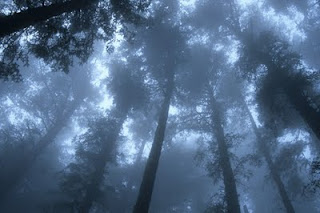 Look Up: More than once, while photographing a scene overhead, hikers walk by, gasp, and confess they never would have noticed the scene if I hadn't been by the side of the trail with my camera. Many times a mediocre photo trip has been saved by a pocket of mist in the canopy of the trees far overhead. The message is simple, don't forget to look up. Above you might be soaring tree trunks, brilliantly lit alpine peaks, or a crescent moon peeking around a cliff. At the very least, you will stretch your aching neck muscles.
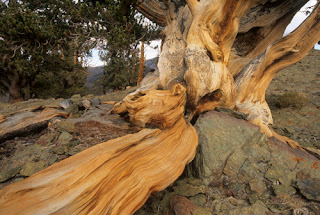 Change Your Perspective: If you ever run into a professional nature photographer in the field at work, chances are they are on their knees or even on their stomach. Why do we spend all that time on the ground? Well, frankly, images taken at eye-level are for the most part (how should I put this delicately?) BORING! We spend most of our lives seeing the world at eye-level. Any photograph taken at a different height becomes unique and interesting. So the next time you are framing the image, remember to try to get low. It just might make a world of difference.
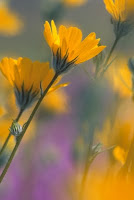 Narrow Your Focus: Most closeup images I see suffer from distracting backgrounds. As nature photographers, we may be tempted to try to get as much in focus as possible, but that can be the death blow to a macro image. Use the largest aperture as practical (think f/4 or f/5.6). The large opening in the lens will only allow for a very narrow depth of field. That, however, is exactly what you are looking for. Shoot wide open, focus perfectly on the subject, and watch the background change from your neighbor's cluttered lawn to beautiful curtains of pastel draped across the image. As an added bonus, wide open apertures allow for faster shutter speeds. That allows you to freeze that flower in a slight (and I stress slight) breeze. A win-win situation and those rarely happen in this business.
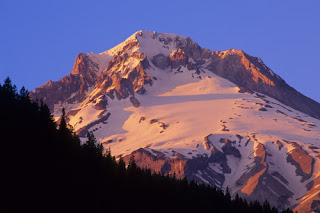 Isolate Your Idea: My college instructor shouted this suggestion out at critique twenty years ago and it still rings in my ears today, "FILL THE FRIGGIN' FRAME!" I have one complaint about most photos I see; the subject is lost somewhere in the rest of the clutter on the image. If you want to include the foreground in your shot, that's fine. However, if you really want the viewer to be amazed by the brilliant last light of day shining on that distant peak, you better use a telephoto lens to isolate the mountain in the frame. If you don't have a long enough lens you can always crop the image in the computer later on.
Most people spend their lives in a form of tunnel vision, viewing the world through eye level. Most nature photographers spend most of their lives trying to escape that viewpoint to create amazing photos. On your next photography trip, try some of the ideas above to mix up your life's viewpoint a little bit and come home with a great image.
Look Down: In our quest to find the next great vista, many times photographers forget to look down at the ground in front of them. At your feet is an endless supply of graphic designs waiting to be recorded on film. Pine cones nestling on a bed of needles, a tiny wildflower swimming in a sea of grass, or layers of rock sweeping across a desert are just a few of the millions of possibilities. If you don't live anywhere near a wilderness, or you are just plain bored with your surroundings, or you are stuck watching the kids in the backyard, looking down is a sure-fire remedy to get out of a rut and start creating images.
 Look Up: More than once, while photographing a scene overhead, hikers walk by, gasp, and confess they never would have noticed the scene if I hadn't been by the side of the trail with my camera. Many times a mediocre photo trip has been saved by a pocket of mist in the canopy of the trees far overhead. The message is simple, don't forget to look up. Above you might be soaring tree trunks, brilliantly lit alpine peaks, or a crescent moon peeking around a cliff. At the very least, you will stretch your aching neck muscles.
 Change Your Perspective: If you ever run into a professional nature photographer in the field at work, chances are they are on their knees or even on their stomach. Why do we spend all that time on the ground? Well, frankly, images taken at eye-level are for the most part (how should I put this delicately?) BORING! We spend most of our lives seeing the world at eye-level. Any photograph taken at a different height becomes unique and interesting. So the next time you are framing the image, remember to try to get low. It just might make a world of difference.
 Narrow Your Focus: Most closeup images I see suffer from distracting backgrounds. As nature photographers, we may be tempted to try to get as much in focus as possible, but that can be the death blow to a macro image. Use the largest aperture as practical (think f/4 or f/5.6). The large opening in the lens will only allow for a very narrow depth of field. That, however, is exactly what you are looking for. Shoot wide open, focus perfectly on the subject, and watch the background change from your neighbor's cluttered lawn to beautiful curtains of pastel draped across the image. As an added bonus, wide open apertures allow for faster shutter speeds. That allows you to freeze that flower in a slight (and I stress slight) breeze. A win-win situation and those rarely happen in this business.
 Isolate Your Idea: My college instructor shouted this suggestion out at critique twenty years ago and it still rings in my ears today, "FILL THE FRIGGIN' FRAME!" I have one complaint about most photos I see; the subject is lost somewhere in the rest of the clutter on the image. If you want to include the foreground in your shot, that's fine. However, if you really want the viewer to be amazed by the brilliant last light of day shining on that distant peak, you better use a telephoto lens to isolate the mountain in the frame. If you don't have a long enough lens you can always crop the image in the computer later on.
Most people spend their lives in a form of tunnel vision, viewing the world through eye level. Most nature photographers spend most of their lives trying to escape that viewpoint to create amazing photos. On your next photography trip, try some of the ideas above to mix up your life's viewpoint a little bit and come home with a great image.
Friday, June 10, 2011
Story Behind The Image - Dream Forest
Sometimes concepts are born out of necessity. The deep forests of the Pacific Northwest are some of my favorite places to photograph. I never seem to grow weary of the endless patterns of green and brown that blanket the mountains, valleys, and coastlines of this corner of the country. The soft diffused light of an overcast day is the perfect situation to capture the colors and contrasts of the deep forests Oftentimes though, I find myself wandering among the trees as the afternoon sun filters through the forest canopy creating a less than ideal situation. While the sunlight creates an atmosphere of dramatic majesty, the harsh contrast between the brightly lit trees and the shadows on the forest floor is too great for a single exposure to handle. In the modern age of digital photography there are many ways to compensate for this problem but during the age of film, it was another story.
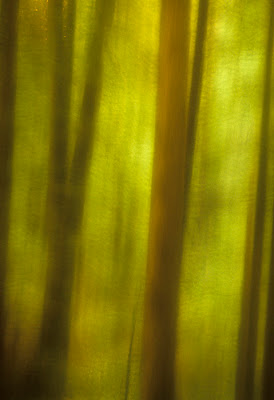 On an afternoon trip to the Oregon coast, I was hiking a trail through the forest to a small secluded beach. I came to a small grouping of tree trunks that stood in a striking formation. I was about to file the location in the back of my brain for future reference when an idea popped into my head. Why not expose the film for the highlights to capture the color and then bleed the exposure across the image by panning the camera using a slow shutter speed. If it worked, it would effectively eliminate the shadows. With no way to preview the images, I stood in the forest for the next hour, panning the camera using different shutter speeds and different exposures. I tossed the four rolls of film into my camera bag and continued down the trail toward my planned destination. Two days later, I saw the results for the first time when I picked up my film at the lab. Most of the frames were filled with beautiful swirling color but they failed miserably to provide any context to the scene. There was one image where the trunks of the trees and the sunlit canopy were aligned just enough to understand what I was looking at.
Today, I can check exposure on the LCD screen of my fancy digital camera. I can take multiple exposures with my camera and combine them in my computer to create an image that captures the deepest shadows and the brightest highlights. Today, there is no need to wait for two days to see if you captured your vision on film. I still miss that moment of anticipation at the lab when the technician hands over those rolls of developed film. Sometimes I think I should turn that screen off and wait two days to see the results....but I never do.
Subscribe to:
Posts (Atom)


